STM32Cube*
About
STM32CubeMX and STM32CubeCLT allow the user to write, compile, and flash code to the STM32 microcontroller! STM32CubeCLT contains the GCC compiler and GDB debugging tool for firmware compilation and debugging, and STM32CubeMX contains the interface for configuring the microcontroller and project environment, and provides a very powerful interface for automatic code generation, allowing the user to initialize an entire module with a few clicks of a button, and have that code show up automatically in the main file.
Note
If you've taken EECS 373, you have likely used STM32CubeIDE, which is an IDE that packages both of these tools together with Eclipse. However, STM32CubeIDE is a very heavy program, and newer versions no longer integrate with CubeMX, so we choose to use the lighter weight STM32CubeMX and STM32CubeCLT tools in combination with CMake and your favorite text editor or IDE.
We do still install CubeIDE (optionally) for graphical debugging. See Debugging with STM32CubeIDE.
STM now has a suite of VS Code extensions that support debugging.
Note
For newer members, EECS 373 no longer uses STM32 MCUs.
Downloading and Installing the Cube Tools (Linux)
On Ubuntu/Debian, the whole toolchain (CubeMX, CubeProgrammer, CubeCLT, the ARM GNU toolchain,
uv, and everything else scripts/build.sh needs) is set up by one script, run once from the
repo root:
This installs ansible (if it isn't already present) and runs the
ansible/bootstrap.yml playbook, which installs system packages, the ARM GNU toolchain, uv, the
cube tools, initializes git submodules, writes your PATH and application launcher entries, and
sets up the python virtual environment at tools/.venv.
Note
Right when you run the script, ansible will prompt you for the BECOME password. This is the same
password you use for sudo, to elevate to local administrator permissions. Ansible needs this to run
some commands (e.g. adding become: true changes apt upgrade to sudo apt upgrade, if you are
unfamiliar with these commands, try to run them to see what they do).
See this
for more information.
The cube tools can't be downloaded automatically as ST gates all of them behind a login (a free
MyST account; you may use any email address) with no stable download URL. Partway through,
./scripts/bootstrap.sh will pause and ask you to:
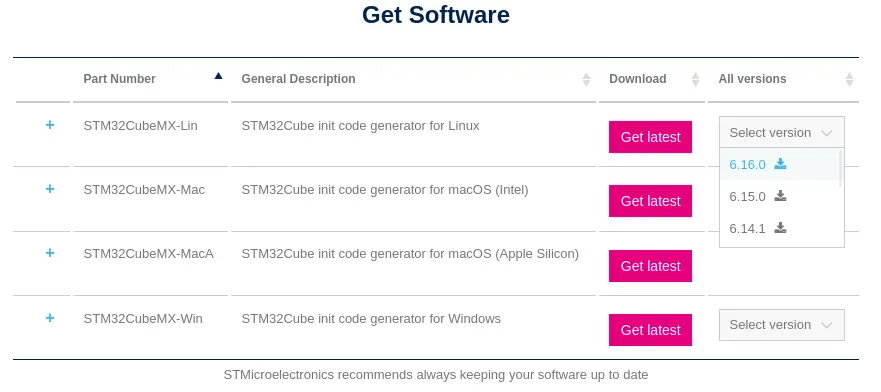
- Go to the CubeMX download page,
select the Linux installer, and download it into
install/at the repo root.
- Go to the CubeProgrammer download page,
select the Linux installer, and download it into
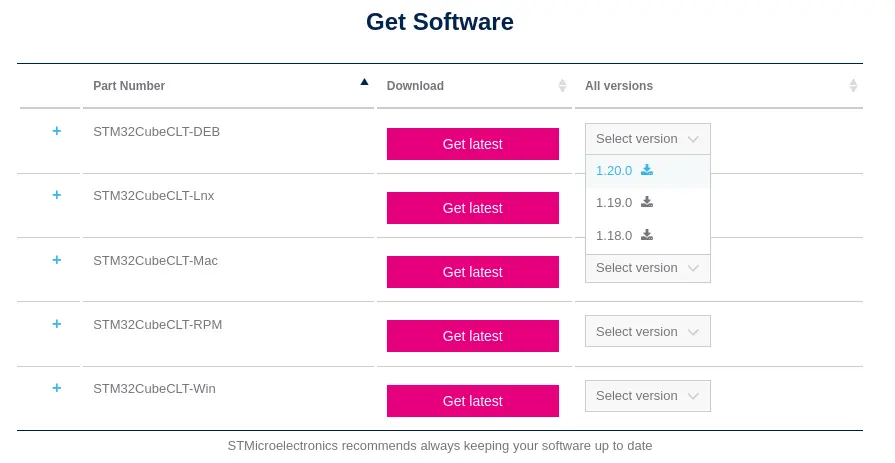
install/as well. - Go to the CubeCLT download page,
select the Debian Linux installer, and download it into
install/as well.
- Optionally, if you want a graphical debugger other than VS Code, go to the CubeIDE
download page, select the
Debian Linux installer, and download it into
install/too. It is a ~3 GB download and is skipped when absent, since nothing in the build flow needs it. - Press
Enterin the terminal runningbootstrap.shto continue.
Note
install/README.md lists the exact filenames the playbook looks for, in case a download lands
under an unexpected name.
The script then unpacks and installs each archive it finds. CubeMX and CubeProgrammer use graphical installers
with no silent-install flag, so two installer windows will open. Click through both, accepting
the default install location (/usr/local/STMicroelectronics/STM32Cube/...). CubeCLT and CubeIDE install
without prompting, but you may see a system prompt related to licensing depending on your OS.
Afterwards, the script adds the tools to your PATH via /etc/profile.d/mrover-esw.sh. Open a new
terminal to pick it up. The script also writes launcher entries for STM32CubeMX and STM32CubeProgrammer into
~/.local/share/applications, so they show up in your applications menu (STM32CubeIDE installs
its own launcher entry system-wide).
System Profile
/etc/profile.d is read by sh/bash login shells, and once by the graphical session when
you log in - but not by zsh: Debian and Ubuntu ship a /etc/zsh/zprofile that is comments
only and never sources /etc/profile. With zsh as your login shell, every terminal would
otherwise inherit the PATH frozen at your last graphical login, and no amount of opening new
terminals would refresh it. Bootstrap therefore also adds a one-line loader to
/etc/zsh/zshenv, which every zsh reads. If ./scripts/doctor.sh reports that the profile
"exists but its directories are not on your PATH", that shell started before the profile was
written, simply open a new one, or exec $SHELL -l. If, for any reason, you need to disable
the STM32 tools on your system, this profile is the mechanism to do so.
The ARM cross-compiler comes from CubeCLT itself; a standalone copy is installed as a fallback but
is ordered after CubeCLT on PATH, so CubeCLT's is the one you get. CubeCLT also ships
STM32_Programmer_CLI, which is the copy on your PATH; the standalone CubeProgrammer is the GUI
you launch from the applications menu when you want to flash or inspect a board interactively.
Verifying the Install
Open a new terminal and run:
This reports the version and location of every required tool, confirms arm-none-eabi-gcc is
coming from CubeCLT, and then builds a small firmware project end to end. If it finishes with
all checks passed, your environment is ready. See Build Tools
for what each check means.
If bootstrap fails partway through, it's safe to re-run ./scripts/bootstrap.sh. Every step
skips itself if it's already done, including the two graphical installers.
Warning
If you run ./scripts/doctor.sh and see any unexpected output, please check with your ESW lead.
There are lots of places the installation can fail silently, and we want to ensure everyone has
a common toolchain so we don't run into any discontinuities down the line.
Upgrading, and Installing Over an Existing Setup
Bootstrap is safe to run on a machine that already has the cube tools installed by hand. It never
removes an existing install; it installs over it and takes ownership of PATH and the launcher
entries.
To upgrade a cube tool, download the newer installer into install/ and re-run
./scripts/bootstrap.sh. Each installer is gated on a stamp file named after the installer itself,
not after the directory it installs into, so a new archive always runs and an unchanged one never
re-runs. Delete the matching install/.installed-* file to force a reinstall.
To redo just one step, for example the PATH setup after a CubeCLT upgrade, run the following:
Valid tags are packages, clang-format, uv, arm-toolchain, submodules, stm,
path-profile, desktop-entries, python-venv and vscode.
Debugging with STM32CubeIDE
CubeIDE is installed as a debugger only, it does not build anything. The build stays
with scripts/build.sh and CMake; CubeIDE attaches to the .elf that build produced. That split
is what keeps the terminal build and CI as the build mechanism, while still giving you breakpoints,
watch expressions, a call stack, live registers and the peripheral (SFR) view.
If you skipped CubeIDE during bootstrap, drop its archive into install/ and re-run
./scripts/bootstrap.sh (see install/README.md).
1. Build the Firmware First
CubeIDE will not build for you, so produce the ELF in a terminal:
Use the Debug preset. Release is optimized, so breakpoints land in surprising places and half
your locals read <optimized out>. The ELF lands at a predictable path:
2. Create a Workspace
Launch STM32CubeIDE from your applications menu. When it asks for a workspace directory, pick
somewhere outside the repository (~/cubeide-workspace is fine). CubeIDE writes a large
.metadata/ tree into its workspace, and you do not want that inside a git checkout.
3. Import the Project
File -> Import... -> C/C++ -> Existing Code as Makefile Project -> Next.
- Existing Code Location: the project directory, e.g.
src/bmc - Toolchain for Indexer Settings: STM32 Cortex-M GCC
- Leave "C" and "C++" both ticked, then
Finish.
This does not set up a build - it just gives CubeIDE the source tree so it can map addresses back
to your files and let you set breakpoints. Turn off Project -> Build Automatically so the IDE
never tries.
4. Create the Debug Configuration
Run -> Debug Configurations... -> select STM32 C/C++ Application -> New Configuration.
On the Main tab:
- Project: the project you just imported
- C/C++ Application: the ELF from step 1, e.g.
src/bmc/build/Debug/bmc.elf - Under Build (if required) before launching, choose Disable auto build, otherwise CubeIDE tries to build a project that has no build configured and refuses to launch.
On the Debugger tab:
- Debug probe: ST-LINK (ST-LINK GDB server)
- Interface: SWD
- Reset behavior: Connect under reset, the reliable choice if the firmware reconfigures
clocks or pins early in
main. - SFRs / Device: point the SVD at the file for your MCU so the peripheral view is populated. For the STM32G431 boards used here:
./scripts/doctor.sh prints the CubeCLT version in use if you are unsure which directory that is.
Apply, then Debug.
5. The Edit-Build-Debug Loop (With CubeIDE)
- Edit code in your normal editor.
./scripts/build.sh --src <project-path> --preset Debugin a terminal.- Back in CubeIDE, hit
Debugagain. It reloads the ELF from disk and re-flashes.
You do not need to re-import or re-create the configuration; only step 2 changes anything.
Tip
If bouncing to a terminal gets old, you can point the imported project's build command at the
real build script: Project -> Properties -> C/C++ Build, untick Use default build
command, and set it to ${ProjDirPath}/../../scripts/build.sh --src ${ProjDirPath} --preset
Debug (adjust the ../.. for how deep the project sits). Then re-enable
Build before launching in the debug configuration and the Debug button does both steps.
Debugging Without CubeIDE
CubeIDE is not the only option, and nothing here depends on it. CubeCLT ships
ST-LINK_gdbserver and arm-none-eabi-gdb, which any GDB front end can drive. The
Cortex-Debug extension
for VS Code and CLion's embedded GDB server configuration both work against the same ELF, and
./scripts/doctor.sh already verifies the gdbserver is present and on PATH.
macOS
./scripts/bootstrap.sh supports macOS as well as Ubuntu/Debian. It uses Homebrew instead of
apt, and Homebrew is the one prerequisite it cannot install for you, get it from
brew.sh first, then run the same command as Linux users:
The flow is identical: it installs ansible (via brew), the build tools, uv, the ARM toolchain
and the cube tools, then writes your PATH and syncs tools/.venv. Download the same archives
into install/, picking the macOS build on each ST download page rather than the Linux one.
Two things differ under the hood:
PATHsetup. macOS has no/etc/profile.d, so the snippet is written to/etc/mrover-esw.shand sourced from both/etc/zshenvand/etc/profile. As on Linux, opening a new terminal is enough; you do not need to log out.- Application shortcuts.
.desktopfiles are an XDG concept and are skipped. ST's macOS installers register their own.appbundles, so CubeMX, CubeProgrammer and CubeIDE appear in Launchpad on their own.
ST packages its macOS tools inconsistently: each download may arrive as a .zip, a .tar.gz, a
.tar.gz wrapped in a .zip, or a .dmg wrapped in a .zip. Bootstrap takes whatever the
download page gives you, so do not unpack or convert anything first. It unpacks one level of
nesting, then installs by what it finds rather than by filename:
.pkg: installed non-interactively withinstaller..app: opened withopen -W, so a window appears for you to click through, exactly like the Linux CubeMX and CubeProgrammer installers..dmg: mounted withhdiutil, and the.pkginside is installed or the.appinside is copied to/Applications. The image is unmounted again whether or not the install succeeded. CubeIDE is normally the one that arrives this way.
Warning
The macOS support is newer and has far less mileage than the Ubuntu path. If an archive unpacks to something bootstrap does not recognize it stops with a message naming the directory it looked in, so you can install that one tool by hand and re-run, everything already installed is skipped.
Verifying the Install on macOS
Open a new terminal and run:
The checks are PATH-based and work the same on macOS; it knows ST's macOS install roots
(/opt/ST, /Applications/STMicroelectronics). The .desktop and /etc/profile.d checks are
Linux-only and are skipped rather than reported as problems.
Creating a New Project
This quick guide will teach you how to make a new project for your STM32G431RB Nucleo board that you will be developing on.
Prerequisites
- STM32CubeMX and STM32CubeCLT installed
Guide
To create a new project, use the scripts/new.sh script. The script accepts either an MCU or Development Board ID, project source, and optionally any number of cmake libraries defined under lib. To create a project for the Nucleo G431RB developer kit, run the following.
When prompted to select default peripheral configurations, select "Unselect All" and "continue".
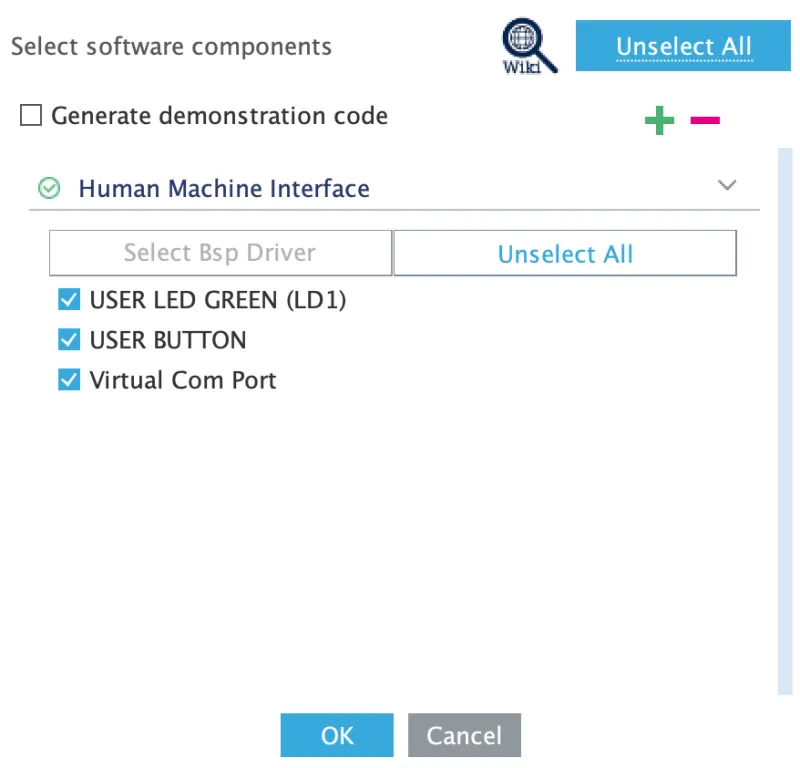
Note
This menu only appears for boards (e.g. NUCLEO-* or EVAL-*), and will not appear for MCU-only projects
as there is no other hardware packaged by ST in that instance.
If this is the first time STM32CubeMX is being run on a machine, it may need to download the firmware repository. Select "Download" and continue.
Once the script completes, try to build the generated project as follows.
If this completes successfully, then STM32CubeCLT is correctly installed on the system.
Open the <project>.ioc file in STM32CubeMX to modify the project configuration.
Congratulations! You have successfully created a new project with CubeMX!
For how the CMake build actually works (the toolchain file, the presets, and the generated libraries) see the Build System reference.